Ansible for Networking: A PrimerAnsible for Networking: A Primer
Learn how to use Ansible for network automation in this step-by-step guide.
May 4, 2017

In our last article, we discussed basic network automation concepts using Python. In this post, we'll build on some of the same concepts with Ansible, which is used for configuration management, general automation, and templated report generation, reducing the need for raw scripting languages. To get started with Ansible, create a few directories, define your inventory of nodes and connection information, then start building playbooks. Playbooks are a simple format for defining the tasks you want to execute. Ansible has built-in capability for interacting with network devices so you may not need to load any additional modules.
Start by going into the directory you created by following the steps we described in our previous article and enabling the virtual environment.

ansible1.png
Install Ansible and setup directories.

ansible2.png
Then add a file called 'ansible.cfg' to tell ansible where to look for other files:

ansible3.png
Create an INI-style file named 'hosts' and add a group label and the hostname or IP of your node. You can list additional modes, below.

ansible4.png
Arista EOS and eos_command support 2 transports: CLI and eAPI. CLI is a plain SSH session while eAPI uses the command API built-in to EOS and returns structured JSON data by default. eAPI must first be enabled on the switch with:

ansible5.png
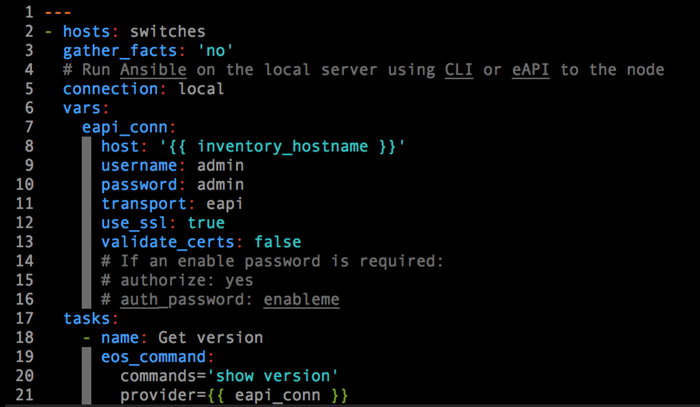
Verify that it is running with 'show management api http-commands'. Then create a playbook named 'check_version.yaml'.

ansible6.png
You can run this playbook with 'ansible-playbook -v check_version.yml' which will gather some data and let us know that we have all the components working. This is a good place to save our work so far.

ansible7.png
Now, let's build a report with the information we gathered using a Jinja2 template. In Jinja2, variables will be substituted in place of the syntax '{{ var_name }}' within the template. Create a basic version_report.j2 template:

ansible8.png
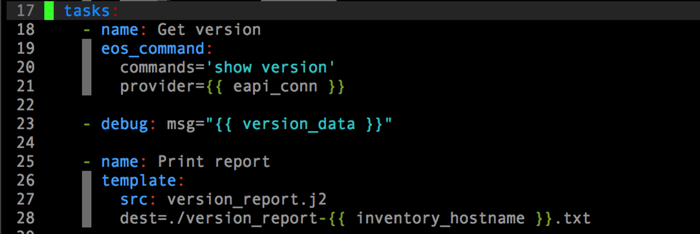
In the playbook, add a new task to generate a report for each node. If you want to visualize the data structure being saved, add a debug task.

ansible9.png
Now, in the get version task, make the output available to other parts of the playbook by registering the output as a variable:

ansible10.png
Then, at the host level, pick out the pieces of information you need for your report:

ansible11.png
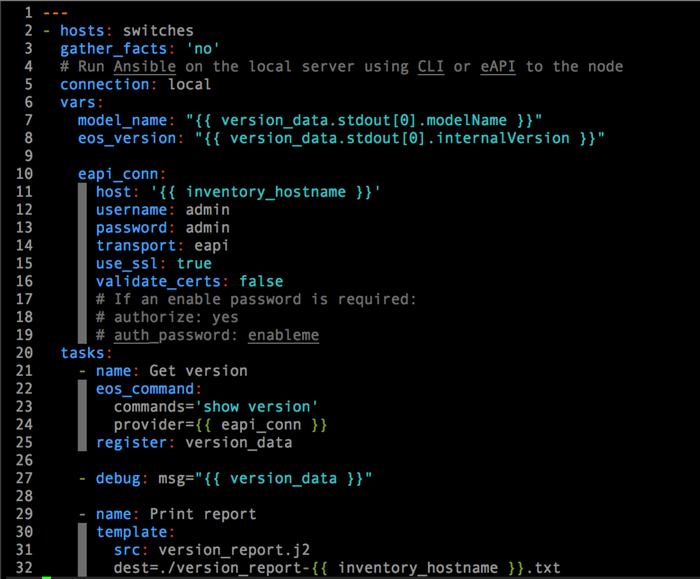
The debug task, above, will help you figure out how to reference the data you want from the variable. The complete playbook should look like the following.

ansible12.png
Now run the playbook, again, then look for the report: 'ansible-playbook check_version.yml'.

ansible13.png
What changes were made? Run 'git diff' to see! Then add and commit the new files and changes.
Meet Jere Julian and Scott Lowe in person at their half-day workshop at InteropITX, "Hands-On Practical Network Automation." The workshop will cover how to get started with network automation, and experts will help guide attendees. Register now for Interop ITX, May 15-19 in Las Vegas.

Jere Julian, DevOps for Networking Evangelist and Extensibility Engineer for Arista Networks, has more than 20 years’ experience in networking and automation. Scott Lowe, Engineering Architect at VMware, is a blogger, speaker, and best-selling author with more than 20 years of experience in the IT industry.
About the Author
You May Also Like


