WiFi Analysis: Testing Radio Links
Tony Fortunato explains what's involved in checking the health of a wireless link.
March 20, 2017

One of my recent projects was a network upgrade that included increasing the bandwidth of a wireless WAN at a remote site. The client company had been offered a 100 Mbps service from its ISP, up from its current 60 Mbps. However, increasing bandwidth isn’t as straightforward as you might think. What would happen if you increased the water pressure on some old marginal plumbing?

wifi 1.jpg
My first step was to check the wireless link to ensure that it's running optimally and can support the higher bandwidth. Assessing the health of a wireless link involves analyzing two items: signal health and device throughput.
Radio statistics
As part of any WiFi analysis, you should always consider performing a WiFi scan to see what nearby devices and channels are in use. A spectrum analysis is ideal, but wasn't possible in this case. The radios in the Ubiquiti access points can perform a WiFi scan, which I prefer since the scan is conducted at the radio's height, orientation, and same antenna/radio specifications. If a scan isn't possible, get another radio or tool, elevate it, and place it close to the existing radio.
Review your product documentation carefully since some manufactures do not allow data to pass during a scan and will effectively cut off your clients. To be on the safe side, I ran this scan when the network was at its lowest utilization.

wifi 2.png
Since every channel in the 5 GHz band is non overlapping and our radio is alone on channel 59, we are good shape.
For Ubiquiti, a rule of thumb is to maintain at least 20 dBm between the reported signal/noise value, therefore our -39/-87 reading is excellent.
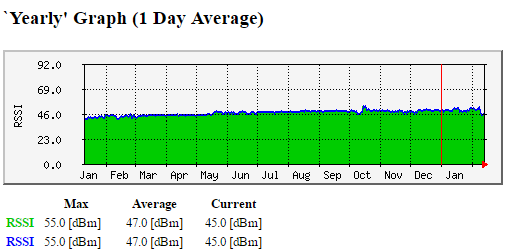
For outside wireless, take measurements when it's windy, foggy, rainy or snowy to better understand how your signal is affected. For this client, I used the Multi Router Traffic Grapher (MRTG) tool to gauge the signal strength for my WiFi analysis. Short and long term data needs to be reviewed to ensure that the signal is stable or consistent. In this example, the signal is quite stable, which is another good thing.

wifi 3.png

wifi 4.png
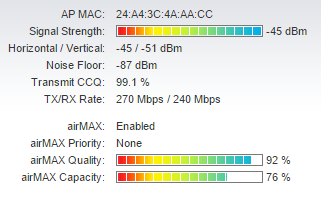
The RSSI (signal strength) for the station (10.16.30.238) was strong and consistent between -43 and -45 dBm. Ubiquiti's airMAX Quality measurement indicates overall wireless health; the vendor recommends an airMAX Quality of 80% or higher, so our 86% and 92% are just fine. The Transmit CCQ is an Ubiquiti specific value which indicates how well the transmit signal is behaving with 100% being optimal; my tests indicated a very good CCQ on both ends.
With wireless you have to be careful of any reported connect speeds, like the 270-240 Mbps reported by our radios these numbers may not reflect the true throughput, which I will test soon.
Speed test
In some cases, I prefer to run the iperf application on two computers to measure throughput, packet loss and jitter. In this case, the Ubiquiti radios have iperf, so I can run the test directly between the radios.
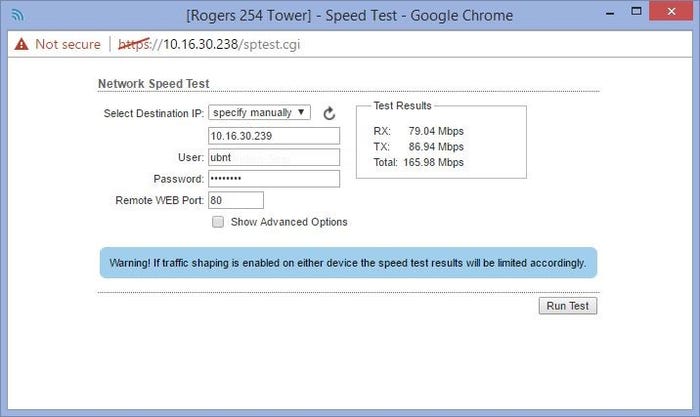
The first test is a simultaneous, or bi-directional data stream to see how much data we can generate in both directions. Based on the mid-200 Mbps reported connect speed, my experience, and the fact that the link is in use, I would have been happy with anything around 140 Mbps. When the test reported approximately 160 Mbps throughput, I was very pleased. I also noticed that the RX and TX values were close, indicating that the antennas between the central AP and other radios (stations) are aligned.

wifi 5.jpg

wifi 6.jpg

wifi 7.jpg
I ran separate upload and downloads to confirm that there weren’t any further anomalies. Altogether, the tests confirmed that the wireless link can support the 100 Mbps upgrade.
In my next article, I'll describe how I tested the router to gauge whether if it can support the higher speeds.
About the Author
You May Also Like


